
 Introduction
A blog is one of the core publishing/communication tools of Web 2.0. A blog, at its simplest, is a website containing an archived series of posts (newest on top), organized by categories (or tags), with a place for readers to leave comments. Readers can subscribe to the blog using a special type of code called an RSS (or similar) feed. A blog may have one or many authors, and can be about any topic, from personal to political to
 professional.
Blogs connect ideas and people.
Blogging can provide teachers and students with an authentic opportunity to express themselves, synthesize ideas from many sources, engage in discussion and debate, write for an audience beyond the classroom, reflect on their own learning, teach and mentor others, and connect with peers and experts around the globe. As you work through the next few "Things," and the remainder of the course, you will begin to learn more about blogs and their powerful potential for personal and professional learning, reflection and communication.
In his book Blogs, Wikis, Podcasts and Other Powerful Web Tools for Classrooms, Will Richardson writes:
...what really distinguishes a blog from your run-of-the-mill Website is much more than process; it's what you'll find there. Weblogs are not built on static chunks of content. Instead, they are comprised of reflections and conversations that in many cases are updated every day (if not three or four times a day). Blogs engage readers with ideas and questions and links. They ask readers to think and to respond. They demand interaction.
We're using blogs in this course because of this interactivity. The blog you are about to create will be a place where you can write reflections on the tools you are playing with and the experience you are having. Other participants in the program can read your postings and you can read theirs. We hope to have lots of commenting and sharing going back and forth across blogs during this program. The more you share with each other, the richer the learning experience will be. And don't forget that your blog is out there live in the "blogosphere." Other people interested in Web 2.0 tools might also read and comment on your posts.
Today, the primary goal is to get you "up and blogging." Your personal blog is the most important component of the Learning 2.0 - 23 Things course. You will use your blog to document your learning, discoveries and experimentation throughout the course. It will also serve as your course portfolio, or record of completion. For tips on using Blogger and maximizing your Learning 2.0 blogging experience, visit the Blogger Help Center.
*************************************************************************************
Discovery Exercise:
As you watch the video below, consider the term "NEWS" as meaning any content or topic that is relevant to you and/or your students.
Blogs in Plain English
Getting started:
There are several free online blog hosting services including Blogger, Wordpress, Typepad or Edublogs. For this course, we're recommending that you use Blogger, because it is extremely easy to use. (Inside the district, you will probably have to override the filter to access it, but its ease of use outweighs the inconvenience of dealing with the override.)
Creating a blog using Blogger takes just three steps:
- Go to the Blogger home page and sign in using the Google account you created in Thing #0.
NOTE: You may choose to blog under your real name or a pseudonym/username, but your blog content should always be school appropriate. Course facilitators will know who you are, but the "world" doesn't have to. - Name your blog (view screenshot)
(NOTE: Remember that the whole web world can see your blog title and blog address, so you probably don’t want to use your real name. Consider creating a blog name that’s anonymous, yet uniquely you. The URL for your blog will look something like these examples:
http://coolcatteacher.blogspot.com/
http://preilly.wordpress.com/
http://topshelf.edublogs.org/
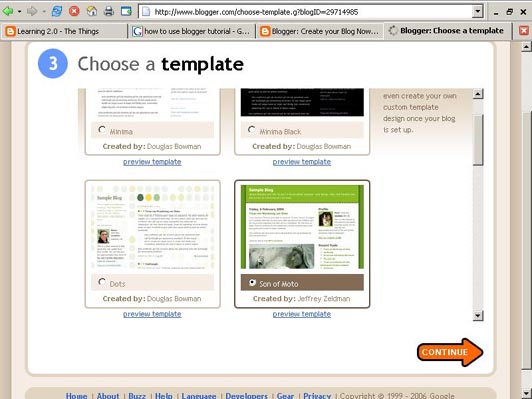
These are real blogs so you can't use any of these! ;-) ) - Select your template (view screenshot).
Blogger has several templates - have fun choosing one for you!
Once you’ve created your blog here are two important things to know:
- To add posts: You will need to sign into Blogger each time you want to add, edit or configure your blog. Be sure to write down your login and password.
(NOTE: It's a good idea to get a small notebook in which to write all the usernames and passwords that you will have to create during this program. All of the tools that we will play with will require you to create an account. Unless you can find a way to use the same sign in information over and over, you will want to have a place to keep all this information together.)
- To view your blog: Your blog address is http://(xxxx).blogspot.com, (xxxx)=the unique identifier you entered in Step 2. Be sure to also write down your blog address.
(NOTE: This is a good time to "bookmark" your blog for easy access throughout the class.)
AN IMPORTANT NOTE
Your blog will serve as the record of your learning in this course. If you are wondering how long your blog posts need to be, please visit the FAQ page. Before you get started blogging, please consider the following:
Tips for a Richer K12 Learning 2.0 Blogging Experience
- Your blog will be as meaningful as you make it. Invest in your reflections and spend a little time crafting your posts. Take time to link, format your text and add images. Feel free go beyond the minimum posting requirements. The blog is truly yours.
- Be brave when posting and celebrate your learning. We all struggle and experience frustration and can benefit from hearing about others' experiences. We also want to hear about your discoveries and problem-solving triumphs!
- Be generous in commenting on other participants blogs. Blogging is meant to engage readers in two-way communication. We are a community of learners. If you take a little time to encourage and respond to others' posts, they will respond in kind.
*************************************************************************************
Learning Activities:
Activity 1: After you have set up your blog, write the following two posts. Be sure to include the Thing # in the Post Title.
POST 1: Thing #1 - Reflections on Lifelong Learning
Write a reflective blog post based on the 7 1/2 Habits of Effective Lifelong Learners. You may write about anything related to your own experiences or beliefs about Lifelong Learning, and your thoughts about this course. The three things you were asked to consider were:
- Which habit(s) may be most challenging for you to employ as part of your Learning 2.0 experience?
- Which habit(s) will be easiest, or are most resonant for you as a lifelong learner?
- Which habit do you think will be most important for you as you work through this course, and why?
Complete a blog post reflecting on your initial thoughts about Web 2.0 and its role in 21st Century teaching and learning. Consider the ways in which Web 2.0 tools might change (or have already changed) your professional practice. How might you be able to use these new tools to engage today's "digital learners?" Why would you want to? How might you be able to use these tools to support your own learning?
Activity 2: Register your blog with the Learning 2.0 team. Send a Gmail message to misd23things@gmail.com and include the following information:
1. Your full name
2. The title of your blog
3. The URL (address) of your blog.
Once we have received your blog address, it will be added to the list of participants on the sidebar of the Learning 2.0 - 23 Things site. That's how you can find other participants to cheer on and connect with!

*************************************************************************************
Stretch Activity #1
(P. S. We hope everyone does this one!) Blogging is meant to be a conversation and we are a community of learners. Check the sidebar of the Learning 2.0 - 23 Things site towards the end of the week and visit the blogs of two (or more) colleagues. Read their Thing #1 or Thing #2 post and leave a comment in response! Type or paste the URL of your own blog in the "website" field so that they know where to find you. Early finishers may have to check back later in the week to find blogs to post to.
Check out these resources for great tips on commenting:
How to comment like a king (or queen!)
Your comments?
Stretch Activity #2
(This one is lots of fun!) Create an avatar for your blog.
An avatar is an online representation of yourself. (You'll notice the avatars for your Learning 2.0 leaders, Mary and Debbie, are at the top of this post.) Go to http://avatars.yahoo.com/ and design an avatar with a background of your choice. (You will have to set up an account in Yahoo if you don't already have one.) Save your avatar and export to your blog.
Video: Here's how to export your avatar to your blog.
or Step by Step
1. From the main Avatars page, find the blue rectangle on the right side of the page, titled Yahoo! Avatars.
2. Click "EXPORT: Use your avatar in web pages and blogs and more."
3. In the center of the page, look for a box labeled "Copy the code below and paste it into your web page or blog."
4. Click the Select All button, then press CTRL-C (PC) or Command (Apple)-C (Mac) to copy the code to your computer's memory.
5. Go to the Dashboard of your blog. Click "LAYOUT."
6. Click Add a Gadget. (This is what you do to add fun things to the sidebar of your blog.) Scroll down to find the HTML/Java Script gadget; click the plus sign to choose it.
7. Click in the Content box of the window that opens. Press CTRL-V (PC) or Command (Apple)-V (Mac) to paste in the code you copied earlier.
8. Click Save. The box will close and you will see the new gadget right under Add a Gadget in the Layout screen.
9. Click Save, then click View Blog. You should now see your beautiful avatar in the right sidebar of your blog!

15 comments:
Just to let you know, my blog is at
http://learningthingsteramshisteacher.blogspot.com/
I hope to use this to communicate with parents and students next year.
http://teachergirl64.blogspot.com/ is where my blog is located. I've had a late start getting going but hope to keep up my momentum.
http://meganlangston.blogspot.com/
This is where my blog is located!
I am in the summer class and guess I am the first to post to this...my blogspot is:
http://stovallsnews@blogspot.com
Please comment with your blogspot as soon as you get it up and going!!
My blog is at:
http://nagtp.blogspot.com
nagtps stands for not a great teacher's posts.
My blog address is perezponderings.blogspot.com
You can view my blog at http://jmf0013.blogspot.com/
Anyone have any ideas of how to include pics in your blog? (And where to find them?)
Check out my blog "lessons from an Aggie" at
http://aggie08blog.blogspot.com/
Also,
My avatar doesn't show up as a picture, only a link to where my avatar is on Yahoo!Avatars. Anyone know how to fix that?
BA, I had the same problem when I tried to display my avatar. I just have a link. Were you ever able to figure it out?
My blog address is:
http://campbellsblog-de.blogspot.com
And my avatar is doing the same thing--showing up as a link to the page, but not showing my picture. Looking forward to someone having the answer! :-)
My blog is:
http://lifeisgood-greengrass.blogspot.com
Maybe this will work!
Check out Shane Huff's blog titled "I see your 23 things and raise you by 23 more" at http://huffonline.blogspot.com/
I finally got my avatar to show up! Thanks for the better directions!!
Post a Comment